
💎 Win through control, support, and collection
Crystal Clash is decided by Alliance Crystal Points, not by who chases the most enemies. Capture useful strongholds, keep them defended, and organize collection when crystals become available. Every attack should help take, hold, recover, or collect something valuable.
⏱️ Follow the event phases—not a 20-minute script
The reference consulted lists a 1-hour battle. Use the actual battlefield countdown and unlock messages; do not treat minutes 17–20 as the end of the match.
| Stage | What opens in the rules screenshot | Practical plan |
|---|---|---|
| Phase 1 | Crystal Prisons, Crystal Ironholds, Refinement Center, and Energy Hub. | Take assigned positions, establish support, and use useful utility buildings. |
| Phase 2 | Central Crystal Ironprison, Pillbox, and Bomber Command Center. | Coordinate the center push without abandoning every other objective. |
| Phase 3 | Crystal Depots appear on the battlefield. | Protect depot gathering and keep valuable strongholds covered. |
| Closing countdown | Check the remaining time and live score. | Hold useful positions, collect reachable crystals, and avoid moves that empty a crucial defense. |
🎯 Prioritize value, timing, and the chance of holding
The center is an important scoring target once available, but priority is not one fixed capture order. A useful early Refinement Center can support the later center push; an undefended Energy Hub can be worth taking while your main attackers are busy elsewhere.
| Objective | Main value | When to commit |
|---|---|---|
| Crystal Ironprison — central prison | Major scoring objective in the center. | After it unlocks, with enough attack and defense support. |
| Crystal Ironholds — east/west fortresses | Important stronghold scoring and map positions. | Secure the assigned hold; contest a vulnerable enemy one when support is available. |
| Crystal Prisons | Ongoing stronghold scoring and nearby collection opportunities when control changes. | Hold useful positions and identify defended targets worth a coordinated push. |
| Refinement Center | Helps crystal acquisition and reduces stronghold control time. | Consider an early capture when its benefit can support multiple later objectives. |
| Pillbox | Combat support for participating troops. | Take it when that support helps the next important fight. |
| Bomber Command Center | Airstrike support against enemy strongholds. | Coordinate its use with an objective attack. |
| Energy Hub | Reduces the cooldown of free Fixed-point Teleport. | Capture when useful and feasible; do not automatically ignore it because it is not the center. |
Check the current building panel for its actual score, effect, control time, and defenders. Do not assume a building's score or effect is unchanged across updates.
🧩 Choose a game class, then assign a team job
| In-game class | Suggested team job | What to coordinate |
|---|---|---|
| Crystal Commander | Lead important attacks and rallies. | Target, formation, timing, and enough joiners. |
| Crystal Warrior | Join attacks, reinforce, and support garrisons. | Rally entry, defense coverage, and when to rotate. |
| Crystal Engineer | Gather from depots and collect scattered crystals. | Safe collection opportunities and protection near fights. |
“Attack,” “defense,” and “collection” are team assignments, not three substitute names for the game's classes. Pair partners or small squads can help coordinate coverage, but two players are not a guaranteed answer to every defended objective.
🔎 Show detailed guide
1. Use the map as an assignment aid
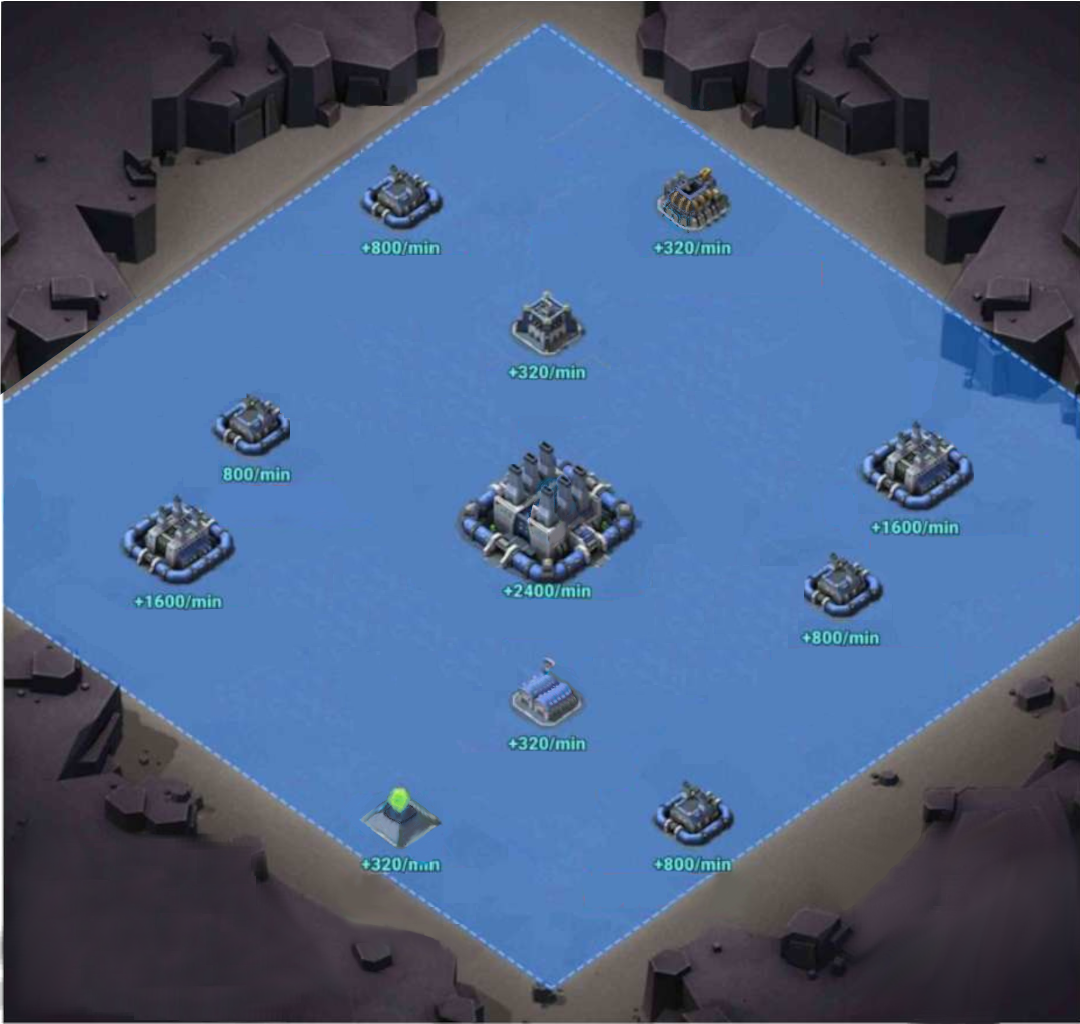
Confirm your starting side, the center, the two Ironholds, nearby Crystal Prisons, and the utility buildings. Give each group:
- A primary objective.
- A reinforcement or backup partner.
- A clear attack, defense, or collection task.
- A fallback position if the objective is lost.
The accompanying community map is a reference layout, not a compulsory allocation for every alliance. Its printed scoring values are observations from that source; confirm them in your own Stronghold panel before building a scoring calculation around them.
2. Decide how much force the target needs
| Target situation | Suggested response | Check before moving |
|---|---|---|
| Empty and useful | Send an available march that can capture it. | Control time and whether anyone can hold it afterward. |
| Lightly defended | Use suitable nearby support or a coordinated small group. | Defender strength and enemy reinforcement distance. |
| Strongly defended | Organize a proper attack or rally with the assigned leader. | Joiners, arrival timing, and the positions you would leave exposed. |
| Cannot be held with current support | Choose another useful objective or regroup. | Whether a brief capture has any realistic scoring or collection value. |
The original example of 2–3 players is a possible group size, not a guarantee of taking a stronghold. Match your force to the defense rather than attacking alone repeatedly.
3. Replace a fixed objective list with a coordinated plan
Before the center unlocks, establish useful positions and consider how Refinement can help subsequent captures. Once the center is available, coordinate its attack while keeping assigned defenders and collectors working elsewhere.
If the center cannot be held, keep the alliance productive: protect the Ironholds and accessible Crystal Prisons, contest useful exposed positions, and collect safely. Do not spend every march on repeated failed center attacks while the rest of the map is abandoned.
4. Coordinate collection with the fight
Engineers should know where depots and scattered crystals are available. Combat players should help keep those locations accessible instead of assuming a capture finishes the job.
When an enemy stronghold is taken, look for any scattered crystals and organize their collection. At the same time, leave enough defense to avoid an immediate counter-capture. A structure, its ongoing scoring, and nearby loose crystals are related but different tasks.
5. Correctly read the 42,000-point example
If a prison displays 42,000 accumulated points, that number alone does not prove your alliance can collect 42,000 points by capturing it. Determine what the number represents, which part is permanent or temporary, and what the game actually makes available for collection.
A coordinated capture can interrupt enemy control, create your own scoring opportunity after control is established, and expose collectible temporary crystals. The gain depends on the actual mechanics, collection, time held, and the enemy response—not a guaranteed transfer of the full displayed amount.
Do not calculate “half of 42,000 is loot” either unless you know that the entire figure is additional production above the supply limit. The supply-limit condition matters.
6. Use partner coverage without making the whole team move together
Pairs are a useful communication model: one player calls pressure, the other supplies support or confirms who will hold. Scale up to squads or rallies when the target needs more force.
Keep some players available to reinforce threatened positions or protect gathering. A single enemy moving across the map should not make every pair leave its assigned structure.
7. Be careful with teleports and exits
Before a relocation, check which troops you have deployed and whether the move would weaken an important garrison or collection task. Confirm the teleport's actual behavior and cooldown in the interface rather than moving reflexively.
The Battlefield Rules screenshot states a 10-minute re-entry wait if you leave the battlefield during the match. Do not leave simply to reset your position without accounting for the time away.
8. Close around the real score and remaining time
- Ahead: protect valuable controlled objectives and avoid exposing them for a low-value chase.
- Behind: identify a reachable objective or collection opportunity that can still change the result.
- Very little time left: check whether a new capture or gathering action can finish usefully before the timer ends.
There is no universal guarantee that a last-second capture secures every temporary point. Prefer actions whose completion and scoring you can verify in the current match.
Final checklist
- In-game class selected and team job agreed.
- Objectives and backup coverage assigned.
- Actual countdown and phase unlocks checked.
- Attack force matched to the defenders.
- Engineers informed of depots and scattered crystals.
- Permanent points distinguished from temporary points.
- Teleports and exits checked before weakening a position.
- Calls based on Alliance Crystal Points, not just personal combat results.